How to Add Custom Fonts to your WordPress Site
Are you looking for ways to personalize your WordPress website by adding custom fonts? Learn how to add custom fonts to your WordPress site easily.

Photo by Brett Jordan on Unsplash
Why would you want to add custom fonts to your WordPress website?
If you’re a brand focused entrepreneur, chances are creating a very personalized web presence is important to you, and how do you do that online?
Images, colors and of course fonts help shape your personalized brand image.
The WordPress platform is a leader among content management systems, which allows the creation of beautiful and convenient web pages without having to have a working knowledge of HTML code.
While WordPress is extremely flexible, most out of the box themes have pretty similar styling. The text’s font plays an important role in this issue. Let’s find out how to install and use classic Sans serif fonts, bold, italics, and other custom WordPress fonts.
What Benefits Does WordPress Provide?
WordPress is an open source system, which means that everyone can see how it works and use it for their own purposes. Many people like the platform because it’s absolutely free — this is also a plus of an open source system. It can be legally installed and used for your needs: from a business card site to a corporate portal.
By downloading the program to a device, the user receives the following benefits:
- Availability of dozens of free themes. WordPress has hundreds of themes that you can customize to your needs. New topics appear every week, allowing you to create not only pleasant to the eye, but also unique pages.
- Mobile device support. Create a mobile version of the site with one click of the computer mouse or choose from a wide range of themes for a suitable responsive design that will look great on any device screen.
- Built-in online photo editor. An editor supports the crop, flip, rotate, zoom and other simple functions. It isn’t an official Photoshop editor, of course, but with the help of such additions, you can improve the quality of your photo materials.
- Powerful WYSIWYG text editor.
- Convenient control panel. Another advantage of WordPress is a simple admin control panel. The WordPress console is intuitive even for a person without experience in CMS. There are several plugins that are responsible for the external design of the future page. By going to the Posts page, you can add a new blog entry. Media Files allows you to upload and edit images and videos. With the help of Comments, you can manage user comments. Appearance will help you create a unique website design, and with the help of Plugins, Tools, and Settings you can customize the project to your needs.
- Variety of themes and plugins. Compared to other platforms, WP is famous for a rich assortment of free themes, which make the design unique and original, and plugins, which expand the functionality of the program and optimize it.
Why Do People Like the WordPress Platform?
WordPress has such great popularity among both experienced users and beginners for a good reason.
Here are the three main arguments for using WordPress:
- Free license—anyone can download the full version of the software from the official website and use the program for an unlimited amount of time.
- Technical parameters of the CMS for the site—the platform is written in the common PHP language, and the MySQL database is used to store information (experienced specialists have the opportunity to make changes to the script and customize it to their needs).
- Versatility and ease of use—currently, the interface is thought out to the smallest detail, and the functionality allows you to create pages of any complexity.
Large CMS capabilities allow you to make almost any web resource. WordPress is most suitable for the formation of blogs, news sites, portfolios, business card sites, and online stores.
Is It Possible to Add Custom Fonts to WordPress? How Do You Do It?
Sometimes you may need to add your own fonts. They will help to refresh the design of your theme and make it memorable. In addition, the use of non-standard fonts in WordPress has become a general trend. Good fonts used to be expensive, but now everything has changed. There are many places where you can find high quality free web fonts, namely: Google Fonts, Typekit, FontSquirrel, and fonts.com.
You can download and install new fonts either manually or by using a special plugin. Let’s look at both methods in more detail below.
Manual Font Addition
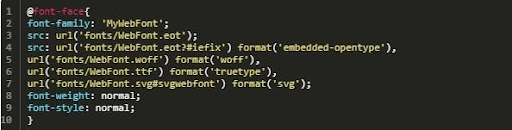
In this method, the @font-face directive plays a major role. Using it allows connecting one or more custom fonts on the site. We’ll try to install four new fonts at once. To do it quickly and efficiently, follow these steps:
- Creating the Fonts folder. In the subsidiary theme of the design, create a new folder called fonts. It should be located in the wp-content/themes/your-child-theme/fonts directory.
- Uploading files to the site. Add the necessary font files to the newly created fonts folder. This can be done via the hosting control panel or via FTP.
- Importing fonts using the subsidiary theme style sheet. Open the style.css file of the theme and add the following code to the beginning of the CSS file.
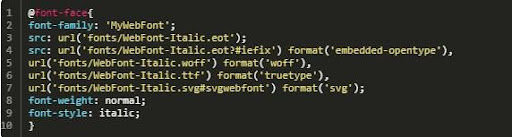
- Adding italics. To add italics, use the following code:
- Adding bold font. Set the font-weight: bold property:

- Connecting bold italics. To complete this task, it’s enough to add the following combination to the code:

Thus, we have simultaneously connected four necessary lanterns to the window. They’re already ready to use!
Connecting using plugins
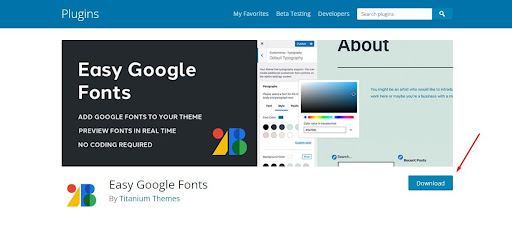
WordPress plugins are designed to change the fonts used on the site. In this tutorial, we’ll look at the Easy Google Fonts plugin. Here are the main actions:
1. Installing the plugin. To do this, go to Plugins > Install to add a new one. Then find the plugin name. In the search results, click Install Now and activate the plugin as soon as it appears on your site.
2. Adding/Changing fonts on the website. When the plugin is active, you’ll find a new menu item called Typography in the Appearance > Settings section.

When you click on it and select Default Typography you see a list of controls for changing the font of your paragraphs and headings. Using them is really simple. Just tap on the drop-down menu that says Change Font for the part of the site for which you want to change it. This gives you access to the following menu:

Here, the most important part is under the font family. You can easily select a new font type from the entire Google font library (use Script/Subset to limit the font selection to those with special characters).
3. Customizing the font. Once you have selected the font, there are many options for further customization of the typography. First of all, you can change the font-weight/style in the menu with the same name. This regulates the letters. In the Text Formatting section, the user has the opportunity to add underscore, strikethrough, and overlay. The Appearance tab allows you to control the font color, background, size, line height, and other parameters.
When you are finally satisfied with the result, click the Save and then Publish buttons.
It’s not hard to create a very custom look on WordPress. The steps above will help you easily add custom fonts to your WordPress website to create the personalized brand image you’re after.